
Review - MOHOC Tactical Head Camera
- HAHO

- Dec 6, 2020
- 14 min read
Updated: Aug 4, 2022


History of MOHOC

MOHOC is a US company specialising in design, development and manufacturing of equipment focussed on the end users, namely the MOHOC Non IR & IR cameras. All of the equipment produced is NATO/NSN ratified and products are designed to provide overwatch, peace of mind and situational awareness to the teams deployed on the ground and the command structure overseeing the operations.
MOHOC are proud to demonstrate that the MOHOC and associated products are at the tip of the C5ISR spear.
For more info - visit the MOHOC website.
Why MOHOC?
The previous SEAL Team - Behind the kit - Helmets blog covered the manufacturers and variants used by Bravo across the seasons. The additional reviews written for the Team Wendy EXFIL Carbon, Charge Pro MPLS, Manta Strobe and Agilite helmet cover covered those tactical accessories used in most deployed situations by Bravo. Seen intermittently through the seasons is the MOHOC tactical camera which was attached to helmets during specific missions.


Helmet cameras are not rare and the variety of manufacturers and models available are abundant, but so is quality. Having previously owned a miniature helmet camera with average image and audio quality I was on the hunt for a new camera. The likes of GoPro featured in many searches along with Garmin, Sony etc. but their shape, mounting restrictions and general mounted appearance put me off. Plus in wanting to keep as close as possible to the Bravo loadout, I pursued the MOHOC.
Research online for the MOHOC heralded very few real use reviews or any actual footage captured by users, and so my interest was piqued and I took the plunge. Again like with much of Bravos' equipment, it's tailored and individual to the operator. Some MOHOCs seen were the base grey colour, others were sprayed to match the helmets disruptive pattern and one was seen covered using Gearskins Multicam combat skin.
Product details
Herein lies the product description from the website;
WEIGHT 7.2 oz / 202 g (inc Li-lon battery)
DIMENSIONS 52mm x 42mm x 88mm (WxHxD)
LENS AP. F/2.8
BATTERY LIFE Continuous record time of 2 hours 45 minutes for 1100 mAh rechargeable and
5+ for CR123A
MICROPHONES 2 External microphones for stereo audio
AUDIO 32kHz – 48kHz depending on video setting
USB micro 2.0 to recharge battery and download video to computer
MEMORY micro SD (micro SD card sold separately)
HDMI Yes, micro HDMI
WIRELESS Yes, 2.4GHz 802.11b/g/n
SENSOR Yes built in Gyro Sensor.
Waterproof to 33 feet (no additional case required)
Drop resistance to 2m
Dust Protection: IP68
Operating Temperature Range: 14⁰ F to 140⁰ F/-10⁰ C to 60⁰ C
VIDEO
SETTINGS 1080p/60FPS, 1080p/30FPS, 720p/120FPS, 720p/60FPS, 720p/30FPS,
and time lapse (60 sec, 30 sec, 5 sec, or 3 sec)
DUAL CAPTURE Ability to take still photos while simultaneously recording video (photo capture
available while in video settings 1080p/30FPS, 720p/60FPS or
720p/30FPS).
VIDEO FORMAT MP4. H.264 codec
VID RATIO 16:9
FIELD OF VIEW 121 degrees
AUDIO Stereo
WHITE BAL. Auto-adjust
ISO Auto (100-3200)
PHOTO
CAMERA 12MP
SENSOR CMOS
IMAGE RATIO 4:3
FILE FORMAT JPG
FIELD OF VIEW 140 degrees
WHITE BAL. Auto-adjust
ISO Auto (100-3200)
Included in box;
MOHOC® Camera
Li-ion Rechargeable Battery, 1100 mAh
Industrial Strength Black Velcro® Strips (Loop)
Micro USB cable to charge battery and download content to computer
Lanyard
Camera bag
Sold Separately: microSD card Class 10 or UHS-1 required. Compatible up to 64GB.
What does it actually mean?
So to cut through some of the lesser known details above I've pulled out the parts that may be of interest;
LENS AP. - F/2.8 - The lens aperture is one way of controlling the exposure. The lower the number, the wider the aperture is. It further controls how much of the scene is in focus in front of and behind the area that you’ve focussed on, this is known as the depth of field. Further basic details can be found on thevideomode.com.
HDMI - inclusion of an HDMI connector built inside the MOHOC, allows the camera to be directly connected to a PC or TV for immediate playback of video or photographs.
WIRELESS - 2.4GHz 802.11b/g/n - the MOHOC can be connected to your mobile device and your wifi network to allow transfer of data from the camera to your mobile. The MOHOC wifi therefore needs to operate in the same band that your standard home wifi operates in.
Dust Protection: IP68 - this is the International Protection regarding protection of equipment from water, dust, electromagnetic interference etc. Further details for IP can be found on Wikipedia. For the MOHOC, the code stands for;
IP - International Protection.
6 - Dust-tight - No ingress of dust; complete protection against contact (dust-tight). A
vacuum must be applied. Test duration of up to 8 hours based on airflow.
8 - Immersion, 1 meter (3'23") or more depth.
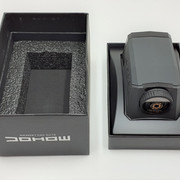
Packaging exterior
The MOHOC is packaged in a simple, sleek and cellophane sealed black card box. The box measures 13 x 9 x 7 cm (L x W x H) and weighs a total of 315g. The top, front and rear bear the MOHOC logo. The left and right hand sides of the box feature an orange schematic drawing of the MOHOC. The underside of the box has a wealth of information on it detailing the cameras capabilities, information, contents, manufacturing details and the product barcode and serial number (S/N: 15490765). The design of the box with all of the key features highlighted and the overall 315g weight reassures you that this product is going to be light and technically detailed.


Packaging interior
Opening up the box, the inside is made up of three sections. The lid section interior has stiff packing foam designed to sit around the MOHOC whilst packaged to prevent it from moving and to further protect from any bumps. The base section of the box is split in two, with the actual camera mounted on a plastic tray with 5 holes punched through it. Removing the camera it's found that the cameras velcro underside is attached through the 5 holes to velcro which is under the tray. Another feature to aid in holding the camera in place. The base tray further holds the ancillaries covered below.


Ancillaries included
The camera comes with a number of ancillaries included that allow the user to get straight into using the MOHOC with minimum fuss. Of note was that the Quick Start Guide provided was different to that published on the MOHOC website that offered a few more pages (based on released versions). The electronic guide can be found here.


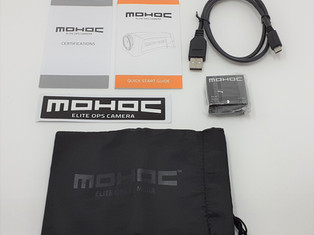


Inside the tray were a number of ancillaries;
MOHOC Elite Ops cloth carry drawstring bag for transport
Mini USB transfer cable
Lanyard
MOHOC Rechargeable battery
2x velcro mounting panels
Certification pamphlet
Quick Start Guide
MOHOC sticker
With the available ancillaries which can be purchased separately, the user can wear the MOHOC on their helmet, body armour shoulder pads, attach it to a rifle or even mount it on a K9s head. The MOHOC is versatile and therefore usable in a multitude of environments and fulfils multiple requirements.
MOHOC exterior in detail


Firstly the MOHOC is lightweight;
175 g (no battery)
203 g (MOHOC rechargeable battery)
207 g (2x CR123 batteries)
The camera measures in at 9 x 5.2 x 4 cm (L x W x H).
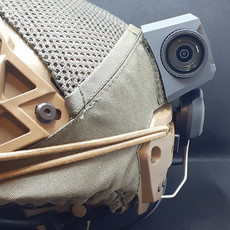
The design of the camera is moulded to be both aerodynamic and waterproof. The low profile of the camera, the sharp and defined exterior and the lack of bulky exterior fastenings allow the wind to pass over it and being a fully sealed unit, it's waterproof up to 10m / 33ft. The MOHOC is manufactured using aluminium alloy on the interior which then has a rubber coating exterior giving it a ruggedized feel and it certainly does not feel fragile. The shape as mentioned above also ensures that it is snag free, with nothing protruding from the camera or fixing points that may catch in a dense woodland or urban environment means that it remains fixed to the helmet. The low profile again helps ensure that it only protrudes 3.5 cm from the side of the helmet. Designed to be operated one handed using the in-built vibrate function, it allows the user to know what setting the camera is changed to without requiring the camera to be removed and light used to change settings. At the rear of the camera is a circular dial with the options of ON / OFF / RECORD. In the centre of the dial is a grey silicone button that enables the camera to take a photo when pressed even when recording.
Curved design


An additional feature of the MOHOC is unlike traditional cameras that are either; boxy, cube shaped, cylindrical etc, these require additional mounting accessories to fix to a helmet. The base of the MOHOC is curved as seen in the above pictures which matches the curvatures of most helmets providing a tight and secure fit to velcro patches mounted on the helmet (or by using one of the supplied velcro patches). The underside of the MOHOC is fitted with hook velcro (labelled on website as 'Industrial strength').
Lens rotation


One selling point of the MOHOC is the 180° rotating lens. This is a fantastic ability for a camera to have, preventing it from being restricted to just horizontal mounting. The rotating lens allows it to be mounted directly on top of a helmet, off to one side at a 45° angle or fully 90° on one side. When looking directly at the lens, on top of the rubber ring surrounding the lens there is a V shape. Part of this V shape in fixed directly onto the camera housing and is fixed, whilst the other part of the V is on the rotating ring. As seen in the 1st picture above, lined up, it means that the lens is in the normal position. Additionally when looking at the lens there are 2 horizontal lines as seen in the 2nd picture which are guides for the user to see at what angle the lens is currently rotated to. To rotate the lens, simply rotate the outer rubber ring. This is stiff and with not much purchase it does rotate in small increments. The 3rd picture shows the lens rotated to be horizontal when the MOHOC is fitted at a 45° angle on a helmet.
MOHOC interior in detail
The interior of the MOHOC is fairly simplistic and this is where the camera settings can be accessed via the onboard system. The top half of the interior houses the LED screen and menu selection buttons. The lower half of the interior is the battery compartment.


The Quick Start Guide provides details around the use of the menu selection buttons and options available regarding setting up the camera.


Of note is that the interior of the camera must be kept clean of water or dust to ensure that no damage is caused to the battery, cable connection slots or SD card slot. The sealed lid will ensure that nothing gets in when properly fitted, however be mindful of your environment when accessing the battery compartment.
Installing the MOHOC battery


Using the MOHOC rechargeable battery provides approximately 2 hours 45 minutes of continuous recording time.
The installation of the MOHOC rechargeable battery is simple. At the rear of the camera housing on both sides there are 2 stiff black buttons that must be pressed in together. When pressed, this releases the lower latch as seen in the 3rd picture which is lifted upwards and seen to be fixed via a hinge. The upper latch holds the battery compartment lid compressed and fixed in position. The lid can be fully removed and will only fit back onto the camera housing one way. On the interior of the lid is a silicone seal running around the entire lid which when fitted and compressed provides a waterproof seal to the battery compartment. The supplied MOHOC battery fits into the battery compartment easily and there is only one way to insert it. The battery has a fixed tab (with an arrow on it as seen in the 10th picture above) which allows the user to pull the battery out of the compartment by loosening it. On each side of the battery is a shallow slot which you can use your fingernail to grip into, again to aid in removing the battery. Once fitted there is no movement and the battery fits tightly. To secure the battery in place and get the unit operational, hook the lid into position, lift the upper latch up and over the rear of the lid and push the entire latch down. Push the lower latch back onto the rear of the camera and push until you hear an audible click and it is not loose.
To recharge the battery, the battery compartment must be open, allowing access to the interior and the micro USB slot. Using the provided USB cable, it can either be plugged into a laptop or PC. If using the PC method, the camera must be switched to the ON position. The second option is to plug the USB cable into a wall power socket which does recharge the battery quicker. Charging is advertised as taking 1 hour 30 mins approx to get the battery up to full charge using a wall power socket. If using this method, the battery recharges whichever position the camera is set to ON / OFF / RECORD.
Installing the CR123 batteries


Using a pair of CR123 batteries provides approximately 5 hours of continuous recording time.
In addition to installing and using the included MOHOC rechargeable battery, the user is also able to install and use a pair of CR123 batteries which increases recording time. To install the batteries follow the above instructions for opening the MOHOC, but place the batteries horizontally so that the positive terminals are on the right hand side as seen in the pictures above.
Installing the Micro SD Card
The MOHOC does not have any internal memory or storage capacity and therefore users are required to purchase a Micro SD card separately. Recommendations are to use a SanDisk Extreme SD Card (Class 10 or UHS-1) up to 64GB. These cards on Amazon are moderately priced therefore you won't be spending a huge amount on it.
To install the Micro SD card, open the battery compartment and remove the lid. At the top of the unit as seen in the 1st picture below between the two connection slots under the screen is the Micro SD card slot. Insert the card with the writing / logo facing you and push until it gives an audible click. Power on the unit to check that the camera reads the card. If successful, the screen will contain the following text as shown in the 4th picture.


Vibration Response

As mentioned, the MOHOC features a vibration response / feedback function. The provided instructions to the left allow the user to know what the MOHOC is set to when powering on or making adjustments. Other than if a technical issue arises, the MOHOC once recording for example does not vibrate or distract the user.
The Warnings response of 5 short vibrations will continue to repeat until the unit is powered off. An example of this warning vibration is if a Micro SD card is not inserted.
Mounting MOHOC on helmet
The MOHOC having a curved base design enables it to fit directly onto a velcro patch attached to a helmet. A quick measurement shows that the MOHOC protrudes approx 3.5 cm from the side of the helmet again proving it's low profile. It's lightweight too, and does not feel like it adds much weight to the helmet. Of note is that depending on fixing position of the MOHOC, it may be worth balancing the helmet ie if fixed on right side of helmet, mounting a light or counterbalance on opposite side of helmet.


MOHOC mobile app

The MOHOC mobile app is available for both Android and iOS. The app at 29mb is quick to download and install.
The app is intended to be used in conjunction with the MOHOC whereby users can connect the app and camera and using their mobile be able to preview their footage live, use mobile for start / stop function amongst other options.

When the MOHOC was seen used by Bravo, the teams plate carriers started to include a rugged mobile phone case which I identified as being manufactured by KÄGWERKS. This was likely done to provide a subtle hint linking the MOHOC camera and the app. In essence using the mobile phone the operator can verify the MOHOC is functioning, angled correctly and also use it to quickly review any video footage or photographs captured.
Using the MOHOC app
Ensure that the MOHOC is switched on and the wifi is switched on using the MOHOCs menu. Connect to your own wifi and enable your location on your phone (requirement to connect the two devices).
Pic 1 - Open the app and it'll give you the loading screen.
Pic 2 - Once completed loading the app will give you the main screen. On this screen the image in the centre will be a still from the last video you recorded or photograph that you too.
Top left 3 bar icon is the Home button. The top right + symbol is the 'Nearby Cameras' search function. In the centre of the screen under the main image is a bar containing MOHOC ID, and timestamp of still. The right facing arrow to the right hand side of this bar is the 'Connect to MOHOC' button.
Pic 3 - Clicking the + symbol (Nearby Cameras) on the top right of the main screen loads the results page. Listed here at the top will be the MOHOC and underneath, any other wifi SSIDs / names. At the bottom is a 'SCAN' button which will rescan the wifi points available.
Pic 4 - Having clicked on the MOHOC tab in the results. This page contains the camera ID, SSID and a form box into which you can enter your password (default is Eliteops). Once done, click 'ADD CAMERA' button at the bottom to add the MOHOC camera to the app.


Pic 5 - Once the MOHOC is added the app will now sit on the 'live preview' page. At the top is the MOHOC ID. To the right hand side is a cog representing the settings button. A bar across the top informs you that it is the live preview, this also contains the date and time. Underneath the bar is a live preview of what the camera can see right now. Under the image are 4 buttons; Take photograph, Start filming, Camera archive and Disconnect.
Pic 6 - Clicking on top right cog icon takes you to settings menu. Video settings (pic 7), Device settings (pic 8), Camera device settings (pic 9), SD card settings (pic 10), Wifi ID and password (pic 11). This page also contains toggle on/off options for Vibrate setting, Power save and Date/Time stamp.
To take a picture on the main screen, simply press the camera icon and the MOHOC is setup
will vibrate to let the user know a photograph has been taken.
To start filming, on the mains screen, press the video camera icon.


Pic 12 - when filming the live preview does not show the footage being recorded. The screen is blank but a red recoding circle appears in the bottom right of the main image.
Pic 13 - to view the photographs or video, click the Camera Archive button, this loads a menu from which you can view the images and video.
Pic 14 & 15 - When clicking on a file, you are given two options. Save to Phone or Delete Archived. If saving a video to phone, you can choose between Lo or Hi resolution (does affect size of file downloaded).
Pic 16 - When you're finished using the app, return to the main screen and simply click the Disconnect button and hit Yes.


Footage
The below YouTube video showcases the MOHOC in use, there are more videos currently being edited which will be added here.
Thoughts and opinion
Helmet and body combat cameras are abundant in the real world. With multiple manufacturers producing, designing and spearheading new tactical opportunities it's an ever changing field. Thankfully both the military / Law Enforcement market and the civilian market are entwined, a new camera designed for snowboarders soon makes its way to operational fields albeit maybe with a few tweaks. Manufacturers will always strive to make cameras more miniature, robust and high quality to suit all users. The MOHOC whilst primarily aimed at the military market does have civilian applications too. Since receiving the MOHOC I've trialled it in a few different scenarios in different weather conditions to try and capture as many scenarios as I can to illustrate quality based on lighting, environment, sound quality etc. to give you an idea of what it's capable of. These photographs and videos are currently being compiled and keep your eyes out for a new page popping up soon!
The MOHOC to me personally looks more professional, is rugged enough and fulfils my requirements of being simplistic to both set up and use, provide good storage and battery life as well as being rugged and drop proof (to a degree). I particularly liked the fact that the lens can be rotated. Most other cameras will only film horizontally and by then placing them at 45° on a helmet, the picture would be quite dis-orientating. This adaptability means that I can fit it wherever required and know that a quick check on the app will give me peace of mind that the picture is correct.
For the same price you could purchase a GoPro or similar but I'm glad that I went down the MOHOC route. My advice is to do the research, think about what you actually want from the camera, is it quality of capture, weight, ruggedness etc and then do even more research on Youtube and blog reviews to get a good feeling about which camera is likely to suit you. I did the above and whilst time consuming, it now means I've got a camera ready to go, whatever my needs, all in a compact high quality rugged package.
Don't forget to check out the HAHO social media platforms below for content, updates and linked articles. Like, Follow, Subscribe and Share!


Final Note
I am not paid for my blogs by the manufacturers or companies that I purchase my items from. I am not offered freebies to promote a product. These blogs are purely written from my own experience in truth to help advise and inform others who may wish to purchase the items or understand more about them. If I am sent a freebie to review this will be stated at the beginning to make you aware.


Comments