
Review - Garmin Foretrex 401
- HAHO

- Nov 4, 2021
- 11 min read


History of Garmin

Garmin (originally called ProNav) was created in 1989 and initially manufactured a GPS unit that cost $2500. In the 90s the US Army became a customer and over the next 30 years the company introduced the world to numerous new and expertly created GPS navigation units. These ranged from vehicle based units to wrist mounted devices and were designed to be multi-market, appealing to civilians, Law Enforcement and the Military.
For more info - visit Garmin website.
Why Garmin?
Garmin is a name synonymous with GPS navigation aides and is one of the go to manufacturers for a variety of GPS equipment suiting everything from the civilian hiker through to law enforcement and military end users. Garmin has over 30 years moved to become one of the world leaders in affordable, compact, rugged yet simplistic equipment for use in everyday scenarios. Since the 90's Garmin has had a large customer base with the US Military and continues to develop and deliver new products that not only benefit the modern US warfighters but emergency services and civilians.


So why hunt down a 401 now? Having used GPS handheld devices and a number of vehicle mounted units before, I wanted to use a lightweight GPS that wouldn't get in the way of day to day work, time spent on the ranges and was easily interchangeable based upon operational loadout. The 401 is regularly seen in SEAL Team used by 2B9 PERRY affixed to his plate carrier. The 401 maintains an air of old school, favoured by a number of US military units and fits the screen accurate kit and equipment I am trying to achieve.


Garmin Wrist Models
Garmin currently has 9 handheld devices on their production line which are pictured below. Each model has different capabilities and ranges in price from £99 - £529.

These models can be found on the Garmin website here with full details and capabilities listed, too many to include here!
Product details
The Foretrex 401 as listed on the Garmin website is marked as a 'Previous Model', i.e. one that is no longer manufactured but can be found in stock at some dealers in the US. Herein lies the product description from the website;
The Foretrex 401 is a slim wrist-mounted GPS navigator perfect for outdoor activities that doesn't require the use of both hands. Foretrex 401 combines a high-sensitivity waterproof GPS receiver, electronic compass and barometric altimeter into a lightweight device ideal for hikers, skiers, campers and military personnel. To share data easily, you can connect Foretrex to your computer with USB or just send data wirelessly to another device.
Durable, IPX7 constructed; works with GPS satellite system to provide accurate positioning.
Know where you are with navigation sensors; compass and barometric altimeter.
Battery life lasts up to 17 hours in navigation mode with 2 AAA batteries.
Included in the box:
Foretrex 401
Wrist expansion strap
USB cable
Owner's manual on disk
Quick start manual
General
Physical dimensions 2.9" x 1.7" x 0.9"
Display size 1.6"
Display resolution 100x 64 pixels
Display type Black and white LCD
Weight 3.1oz with batteries
Battery type 2 AAA batteries
Battery life Up to 17 hours in GPS mode
WATER RATING IPX7
Maps & memory
Basemap, Waypoints, Favourites, Locations, Track Log and Routes
Sensors
Barometric Altimeter, Compass
There is a huge list of additional features, again too numerous to list in full here, however below are the highlights;
Clock features: time/date, GPS time sync, automatic daylight saving time, alarm clock, timer, stopwatch, sunrise/sunset times
GPS-based distance, time and pace
Jumpmaster
Point-to-point navigation
TracBack
Distance to destination
Barometric trend indicator
Packaging exterior
The 401 purchased was second hand and therefore did not come with its original packaging. All parts included were contained within a sealable plastic bag.
Contents

The contents included;
2x 401 straps
1x 401 strap extender
2x attachment pins
USB cable (standard USB one end and mini USB other end)
Quick start manuals (English, Spanish, Italian, German)
Product info leaflet
Owners Manual CD
401 exterior in detail
The 401 is manufactured using hardened lightweight plastic and rubber material with a black and white LCD screen.

401 Measurements
Height 2.1 cm
Width 4 cm
Length 7.4 cm
The 401 weighs 48g (no batteries installed)
The 401 weighs 63g (2x batteries installed)
The 401 is simplistically split into 7 parts; screen, front face, surround, button area, rear face, battery compartment and attachment pin points.


The front face has the product marking 'GARMIN foretrex 401' marking as well as the labels for the button area visible. Set in the front face offset slightly to the right is the LCD screen measuring 4 x 2.6 cm (W x H) or 1.5" x 1". The screen displays in black and white although it does appear to have a green hue to it. The surround is made from a rubber impact type material that provides protection against the 401 if dropped. The 401 edges are cleverly also rounded and does not have pointed corners, again aiding in both providing rolling corners to give protection, but also to be user friendly if mounted on the operators wrist and prevents it from not digging in.


The button area has 5 buttons in total; 1x slightly raised and 4x protruding. These buttons have corresponding functions marked on the front face; Power, Page / GoTo, Enter / Mark and the UP and DOWN arrows.


The rear face comprising of hardened plastic features the 4x screws which when undone enable access to the interior of the 401. These are Torx screws (star shaped). The rear face also features the two attachment pin points. The final section to mention is the battery compartment which has one hook and clip on the left hand side. The compartment houses 2x AAA batteries.
The exterior of the 401 as mentioned is simplistic, void of any protruding parts and sleek. It's simplicity means that it's less likely to catch on clothing, equipment or a slung rifle and its dull colouring is particularly suited for an operational environment. By ensuring that the buttons are slightly raised and provide dual functions, it enables the 401 to be operated using one hand easily.
Installing AAA battery
The 401 uses 2x AAA batteries. These are placed in the battery compartment which is accessible on the rear face. The hook and clip door is securely held in place and care should be taken to open it so as not to snap off the hook part of the door. The interior wall of the battery compartment features a compressible foam lip (image 6) that creates an airtight and watertight seal around the compartment. When closed the door makes an audible click and there is zero movement.


Whilst installing the batteries, there are two codes noticeable inside the battery compartment; the FCC ID and IC.
The FCC ID is the product ID assigned by the FCC (Federal Communications Commission) to identify wireless products in the market. The FCC ID when queried in Google returned this information.
The IC ID is the product ID assigned by IC (Industry Canada) to identify wireless products in the Canadian market. The IC ID when queried in Google returned this information.
Operating the 401
To operate the 401, there are 5 buttons on the bottom side of the front face; Power, Page / GoTo, Enter / Mark and the UP and DOWN arrows.
POWER
Primary function - when the 401 is turned off, pressing and holding the button powers on the 401. Pressing and holding the button for 5 seconds when the 401 is turned on will turn the unit off.
Secondary function - when turned on, a quick press of the Power button will cause the backlight to illuminate the screen for approx 30 seconds.
Page / GoTo
Primary function - pressing this button once will cycle through the available pages on the 401; Main page, Compass page, Elevation page, Trip computer and Main menu.
Secondary function - press once to exit page / menu selection or when navigating, pressing and holding will enable the unit to navigate towards a specific waypoint.
Enter / Mark
Primary function - press to select options on menu / pages.
Secondary function - press and hold to mark a waypoint at current position on main page.
UP and Down Arrows
Primary function - press to scroll through menus / pages.
Secondary function - press to zoom in or out of map view on main page.
Main pages
There are 5 main pages; Main page (image 1), Compass page (2), Elevation page (3), Trip computer (4) and Main menu (5) which are pictured below.


Main page provides the operator with a simplistic map view plotting the current location at the centre of the screen marked by the icon of a person. The bottom left features a scale and the top left shows a battery indicator, satellite lock symbol and the heading in degrees and direction that the operator is walking in.
Pressing the enter/mark button brings up a number of options;
Pan track log - enables operator to view tracked routes.
Clear track log - clears tracked routes.
Measure distance - detailed page that allows operator to measure distance between current
position and marked waypoint or waypoint to waypoint. Speed can be adjusted also. The
401 then calculates distance, direction and time required to move from point to point.
Map detail - operator can choose to add tracks onto map and hide / show marked
waypoints.
Pressing the UP and DOWN arrows zooms the map in and out.
Compass page provides a visual compass reference indicating direction of N E S W with the arrow pointing in the direction that the operator is walking in. Compass does require calibration for accurate use. Recommended to calibrate each time prior to usage of 401.
Pressing the enter/mark button brings up 2 options;
Calibrate compass - to calibrate press the enter/mark button and follow instructions which tell
operator to turn slowly in two full circles which will enable accurate calibration of the
compass.
Change fields - pressing this option enables the operator to edit all of the fields on the
Compass page.
Elevation page shows the operators current elevation. Barometric altimeter does require calibration for accurate use. (A barometric altimeter measures altitude by calculating the location's air pressure. Air pressure decreases as altitude increases).
Pressing the enter/mark button brings up a number of options;
Plot over time - this plots the operators elevation over a period of time. Using the UP and
DOWN arrows, the time period can be changed.
Zoom elevation - this plots a zoomed version of the elevation plot based on operator selected
elevation. Using the UP and DOWN arrows, the elevation can be changed.
View points - operator can view large time period of elevation and move left and right using
the UP and DOWN arrows to select a time / date and view the elevation at that time.
Trip computer combines a number of displays and can show other useful details.
The main information displays are;
Max speed, Trip odometer, Movement average, Movement time, Location (geo co-ordinates
in Lat and Lon format), Elevation and Speed.
Pressing the enter/mark button brings up 2 options;
Change fields - enables the operator to change any of the fields on this page. When
changing a field, pressing the enter/mark button brings up a further sub menu from which a
number of additional options can be chosen such as; sunset, heading, final ETA etc...
Reset trip data - resets trip and elevation data.
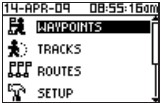
Main menu gives the operator access to a number of menu pages enabling the setting up of the 401 and making any changes whilst on the move. At the top of this page is the current date and time.
The main options on this page are;
Waypoints, Tracks, Routes, Setup, Connect, GPS and Jumpmaster.
Attachment methods
The 401 can be attached onto the operators wrist or to equipment, depending on the situation. The 401 came with 2 wrist straps and an extender. The purpose of the extender is to make the wrist strap larger thus enabling the 401 to be worn on the wrist on the outside of a thick winter coat for example. As shown in the two examples below, one of the wrist straps has been used to mount the 401 on the wrist. The second example shows where the 401 has been mounted vertically on the Crye Precision AVS (as seen worn by 2B9 PERRY in SEAL Team). Mounting location will depend upon user preference and requirement during task.


Raptor Tactical Spider Garmin GPS cover
In addition to the provided wrist straps and extender, purchased second hand it came with a Raptor Tactical cover. This durable little cover added yet another layer of protection to the 401. The pouch features a thin plastic window to enable the operator to view the screen. At the bottom of the cover are 5 holes cut for the buttons and the exterior of the cover also features the button markings which have been lasered on. The 3 velcro layers that secure the 401 inside the cover ensure that it will not fall out, even under stress. The cover again like the Garmin wrist strap enables the user to mount it on their wrist directly or onto equipment.


Maintenance
Maintenance of the 401 is highly important, especially if using the 401 by itself when out on a hike, training or in an operational theatre. As with all electronic equipment, any removal of the rear face in total via the Torx screws and exposing the interior electronics is likely to be nothing but bad news. Highly recommend that for maintenance of the 401 you follow the below;
Cleaning is limited to exterior of the 401
If battery compartment requires cleaning, dry materials such as cloth or cotton bud to be used only
Fingerprints and lubricants can be removed using a lens cloth or soft cotton cloth
Exterior can be wiped using slightly damp cloth
If 401 becomes wet or submerged, remove excess water droplets, open battery compartment and remove batteries, then allow to dry naturally
After use or if being stored for a period of time, remove the batteries
Testing
The 401 was taken for testing to look at features it provides, accuracy, operability, reliability and to test it during various weather types.
Urban (light) environment - in a lightly built up area, the 401 did not have any issues. Navigation from point to point was simplistic and namely accurate to approx 6m.
Urban (dense) environment - in a densely built up area, the 401 again did not have any debilitating issues. On 2 occasions when in a narrow street and high buildings on either side, the GPS took a few seconds to catch up when walking the 20m+ length of the street.
Open ground - on hilly open terrain the 401 worked flawlessly. Navigation from point to point was accurate to within 2m of each designated waypoint.
Dense forest - when used within a dense forest, the intermittent break in tree cover did ensure that the 401 was able to maintain an accurate position. On a few occasions similar to the dense urban environment, the 401 took a few seconds to catch up with position.
Highly recommend that if purchased, time is spent reading the quick start manual to get to grips quickly with the layout, options and pages. Failure to do so may have consequences! The second main point to note is the barometric altimeter. These altimeters are notoriously inaccurate and the 401 is no different. For my requirements an accurate representation of altitude was not required and therefore not of huge significance to me. Whilst calibrating the barometric altimeter did reduce the inaccuracy, over testing I saw a wide range of fluxes ranging from 10m to 450m.
Thoughts and opinion
It's easy to see why Garmin is one of the world leading GPS navigation device manufacturers. New products bring the latest high tech capabilities right into the palm of the user and the continually evolving devices ensures that there is a Garmin product out there to suit most.
The need for GPS navigation devices (personnel or vehicle based) provides users with peace of mind and security. These devices are inherently simple to use and could save your life whether it be in a situation where you're lost hiking in the mountains, tracking multiple Law Enforcement Officers in pursuit through a busy neighbourhood, or identifying your position to friendly forces, every situation is unique.
The Garmin Foretrex 401 for me was purchased to fulfil part of a SEAL Team accurate loadout, whilst also ensuring that what was purchased was actually useful. Having owned several other Garmin products over the years, the smaller 401 was always on the horizon. It's lightweight and simplistic design certainly appealed to me, though the availability and quality of what was being sold (ie damaged screens and missing parts) was what meant I was never able to get one before now.
Can I recommend the Garmin Foretrex 401? Yes. There are a wealth of YouTube videos out there delving into more intricate detail, each and every one of the available options on the 401s extensive menu screens. I would further recommend purchasing a cover if the 401 is going to be used for anything other than hiking, simply to add another layer of protection. I've also ordered a plastic screen protector to fit neatly on top of the screen to prevent sand, grit, mud etc affecting the screen. Put it all together and you'll have a neat bundle that can be put into your pocket, attached to your wrist or o the exterior of your rucksack and you won't even notice it's there. For me, it's the fact that the 401 is lightweight, reliable, un-obtrusive and simple to use out of the box.
Don't forget to check out the HAHO social media platforms below for content, updates and linked articles. Like, Follow, Subscribe and Share!


Final Note
I am not paid for my blogs by the manufacturers or companies that I purchase my items from. I am not offered freebies to promote a product. These blogs are purely written from my own experience in truth to help advise and inform others who may wish to purchase the items or understand more about them. If I am sent a freebie to review this will be stated at the beginning to make you aware.


XX88 mình thấy bạn bè nhắc hoài nên bấm vào xem thử cho biết, kiểu chỉ nghía giao diện chứ không đào sâu nội dung gì. Vào cái là thấy trang làm khá “dễ thở”, khoảng trắng vừa đủ nên mắt không bị ngợp. Mình để ý họ chia thông tin thành từng khối rõ ràng, nhìn lướt là biết đoạn nào nói về gì, không bị dính chùm một cục dài ngoằng. Cái menu cũng nằm chỗ dễ thấy nên chuyển qua lại mấy mục nhanh, không phải mò. Nói chung cảm giác như họ ưu tiên người mới, nên mọi thứ sắp xếp gọn và dễ hiểu ngay từ lần đầu. Mình thích nhất là cách họ nhóm…